Car Shaders
 A good car shader is very important for a good render output. We often see impressive car models, but with a bad shader.
I have shared a few ways of how I go about painting my CG cars
For this exercise, I have used 3ds max
Vray:
This has always been my chosen renderer or inorganic rendering. Lets see how we would get good shaders in vray
There are several ways to make good car paints. Some use material blends, some use shellac and some simple diffuse gradients. I have discussed a few that come very handy
Lets start
First we need to a simple studio set. So create a spline curve and then extrude.
This gives us the studio base and the background. Give it a white or grey vray diffuse
Now that we also need some props, lets use our all time favorite, 3ds max spheres!
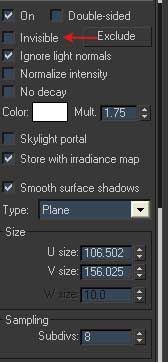
Next is setting up studio lights. I don’t really use the 3-point light system for every studio set. It majorly depends upon the scene requirement. But for this one, I used 2 vray lights and one self-illuminating plane. The two lights have the following settings.
This is what I used for the self-illuminating plane
Lets get back to the tougher part: The shaders:
I don’t always use the same shading method for cg
cars, since sometimes agrainlessshader might me the
requirement, whereas in certain cases, a metallic sheen
would be the requirement.
This time, I will use shellac.
Set the shellac blending to 90%
On both the slots I have used vray material.
For the base:
Set the diffuse color to black. On reflection, select falloff. (fresnel). And grey and white colors respectively for front/side slots. The reflection glossiness is set to 1, with a perpendicular/parallel falloff on it. To explain it further here are a number of screenshots.
Now lets get back to shellac. For the shellac material,
in the second slot, lets make the topcoat.
Select the diffuse color as per the color o the car.
Reflection is set to 250. Reflection glossiness is 1
Fresnel reflections on.
Heres the screenshot
Assign the shellacs to out teapots. Assign the vray
light mtl to the plane above
Turn on indirect illumination. I have used photons or
secondary bounce and gamma correction for the color mapping.
The AA filter is Mitchell Netravali
Here are few examples of the same shader with different topcoat diffuse